
How Do You Install Surface Mount Hinges on Cabinet Doors Correctly?
If you've been searching for guidance on how to install surface mount hinges on cabinet doors, you've probably noticed that most results take you straight to a product page. You get a photo of the hinge, a finish selector, and an add-to-cart button — but nothing that tells you what to actually do with the thing once it arrives. That's the gap this guide closes.
At ForndLock, we manufacture cabinet surface mount hinges and supply them to industrial enclosure manufacturers, equipment integrators, and engineering specialists handling everything from single-panel maintenance to large-scale infrastructure projects. We consistently address identical installation challenges from the field, meaning we know exactly where technicians encounter difficulties. This guide covers the complete installation workflow — from tool preparation through torque tightening — for both overlay and inset configurations, including surface-mount methods for inset doors without custom profiling.
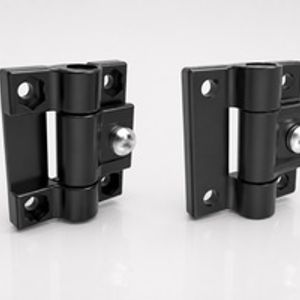
What Tools Do You Need Before Starting?
You only need a handful of common tools to install surface mount cabinet hinges — a pencil, a combination square, a self-centering punch or awl, a cordless drill with a small pilot bit, and a screwdriver. Having everything staged before you begin is what separates a 20-minute job from a frustrating afternoon.
Here's the complete list:
· Pencil and combination square (for marking consistent hinge height)
· Self-centering punch or awl (prevents drill bit walking on hardwood faces)
· Cordless drill with a 1/16" or 3/32" pilot bit — bit size matters here; too large and the screw won't grip
· Phillips or slotted screwdriver matched to the included screw heads
· Painter's tape (optional, but useful for marking reference lines on painted doors)
· Small wooden shims or folded cardboard (for holding the door in position during marking)
A note on screws: ForndLock surface mount hinges ship with matched screws sized specifically for the hinge leaf thickness and typical door stile dimensions. Using aftermarket screws that are too long is a common mistake — it risks splitting thin stiles, especially on older cabinetry. Stick with what's in the pack unless you have a specific reason to substitute.
Pilot holes deserve their own mention. Hardwood cabinet faces — oak, maple, cherry — will cause screws to wander or split the grain if you drive directly without a pilot. We hear from customers regularly who skipped this step on oak face-frame cabinets and ended up with cracked stiles or screws that went in crooked. Drilling a pilot takes about ten seconds per hole. It's never optional on hardwood.
ForndLock Hinge Product Range
How Do You Mark and Position Hinges Accurately?
Accurate hinge placement starts with a consistent setback measurement from the top and bottom of the door — most surface mount cabinet hinges perform best when positioned 2 to 3 inches from each door corner, with the barrel of the hinge sitting just shy of halfway across the door's hinge stile edge.
Why Does Barrel Position Affect Door Gap?
Where you position the barrel relative to the door edge directly controls the gap between the door face and the cabinet frame — set the barrel too far inward and the door binds; too far outward and you get an uneven, sloppy gap.
The barrel — the knuckle section where the pin runs — should sit just under halfway over the door's hinge stile edge. This geometry creates a small, consistent reveal gap of roughly 1/16" to 1/8" between the closed door and the face frame. When this is off, no amount of screw adjustment will fix it. Doors that rub on one side, gaps that are wider at the bottom than the top, or hinge leaves that lift under load — these all trace back to barrel position being wrong at the layout stage.
A practical trick we recommend: cut a scrap of 1/8" hardboard to use as a spacer gauge. Hold it against the door edge and position the barrel flush against it. This gives you a repeatable reference across every hinge on a multi-door run, which matters more than people expect when six doors are hanging side by side.
How Do You Mark Hinge Position Without a Template?
Tape the hinge leaf flat against the door face at the correct height, trace the screw hole locations with a sharp pencil, then remove the hinge and punch each mark before drilling — this two-step trace-then-punch method is more reliable than measuring each hole individually.

Step-by-step marking sequence:
1. Set the door on a flat surface or hold it upright in the opening with shims
2. Measure up 2.5" from the bottom edge and draw a horizontal reference line with the combination square
3. Position the hinge leaf so the barrel sits at the correct edge setback
4. Trace all screw holes with a sharp pencil
5. Repeat for the top hinge, measuring 2.5" down from the top edge
6. Punch all marks before moving the door
For a pair of doors meeting at a center stile, mark both doors at the same time when possible. Mismatched hinge heights between left and right doors are visible even when the doors are closed — the horizontal line of the barrel reads clearly across the gap.
Door Height | Recommended Hinge Setback from Corner |
Under 24" | 2" from each corner |
24" – 36" | 2.5" from each corner |
Over 36" | 3" from each corner, consider a third hinge at center |
How Do You Install Surface Mount Hinges Step by Step?
Install the door-side hinge leaf first, then hang the door in the opening and use the second leaf to mark the cabinet or face frame — this sequence prevents the most common alignment error, which is attaching both sides independently and discovering they don't line up.
How Do You Attach the Hinge to the Door First?
Drill pilot holes at your punched marks, hold the hinge leaf flat against the door face, and drive screws snugly but not fully tight — leaving them slightly loose lets you make micro-adjustments before committing.
With pilot holes drilled, position the hinge leaf and start all screws by hand first to confirm alignment before driving any of them. This matters because a hinge that's slightly cocked at the first screw will be visibly off by the time you reach the last one. Drive to snug, not to torque. Repeat for both hinges on the door, then check that both barrels are at the same height and the same distance from the door edge before moving on.
How Do You Transfer Marks to the Cabinet Frame?
With the door-side hinges attached, hold the door in its open position against the cabinet face frame and use the free hinge leaf as a direct template to mark the frame — this eliminates measurement transfer errors entirely.
Use shims to hold the door at the correct reveal height — typically 1/8" above the cabinet floor or bottom rail. With the door shimmed in position, press the free hinge leaf flat against the face frame and trace the screw holes directly. Remove the door, punch the marks, drill pilots in the frame, then rehang the door and drive the cabinet-side screws snug.
Final tightening sequence: door-side screws first, then cabinet-side. This keeps the door-side geometry locked while you finalize the frame attachment.
One note specific to ForndLock hinges: our surface mount cabinet hinges include a center-marked barrel, which makes barrel-to-edge alignment faster than on generic hinges where you have to eyeball the midpoint. It's a small detail that adds up across a full cabinet run.
Does the Process Change for Inset Doors Without Routing?
For inset cabinet doors, you do not need to rout a mortise when using surface mount hinges — the offset built into the hinge leaf accounts for the door thickness and keeps the door face flush with the cabinet frame, provided you select a hinge with the correct offset dimension for your door thickness.
Inset doors sit inside the cabinet opening rather than overlaying it, flush with the face frame. Traditionally, this configuration required a mortised butt hinge — a process that involves routing a shallow pocket into both the door edge and the frame. Surface mount cabinet hinges for inset doors without routing eliminate that step entirely. The offset leaf design compensates for door thickness without any wood removal, and the installation steps are identical to everything described above.
How to confirm you have the right offset: measure your door thickness, subtract the reveal you want, and match that to the hinge's offset spec. A 3/8" offset hinge on a standard 3/4" door produces roughly a 3/8" reveal — which is correct for most face-frame inset cabinetry.
Door Thickness | Common Offset Needed | Resulting Reveal |
1/2" | 1/4" offset | ~1/4" |
3/4" | 3/8" offset | ~3/8" |
7/8" | 1/2" offset | ~1/2" |
What goes wrong when the offset is mismatched: a door that sits proud of the frame means too little offset; a door that's unevenly recessed means too much. Neither condition is correctable by adjusting screws — it requires selecting the right hinge before installation. ForndLock manufactures offset surface mount hinges for inset doors without routing in multiple leaf configurations, so if your door thickness falls outside standard dimensions, that's worth specifying before you order.
What Mistakes Cause Misaligned Doors and How Do You Fix Them?
The three most common causes of a misaligned cabinet door after surface mount hinge installation are unequal barrel setback between the two hinges, screw holes that drifted off-mark without pilot holes, and hinge heights that don't match between the door side and the cabinet side — each has a straightforward fix.
Door binds or won't close flush: the most likely cause is the barrel set too far inward, or a hinge leaf that isn't fully seated flat. A paint ridge under the leaf, a burr on the hinge casting, or a screw head sitting proud of the countersink can all create a gap under the leaf that throws the barrel position off. Back out the screws, check the bearing surface, and re-drive. If barrel position is the root issue, you can elongate the screw holes slightly with a rat-tail file to shift the leaf outward — but this only works within a small range.
Door sags or one corner drops: this almost always means mismatched hinge heights between the door-side and cabinet-side attachment, or one hinge installed at a slight angle. Loosen the lower hinge's cabinet-side screws, lift the door to the correct position, and re-mark. Do not try to compensate by over-tightening the upper hinge — it transfers stress to the upper leaf and creates a new problem.
Screws won't hold or strip out: pilot holes drilled too large, or screws driven into end grain rather than face grain. The fix is to fill the stripped hole with a wooden toothpick and wood glue, let it cure fully, then re-drive into the filled material. For end-grain situations, consider repositioning the hinge slightly so the screws land in face grain, or use a slightly longer screw with a wider thread pitch.
One thing worth keeping in mind: unlike European cup hinges, surface mount hinges have no built-in adjustment mechanism. There's no cam to turn, no slot to slide. Getting the initial placement right is the only real corrective tool available — which is why the marking and positioning steps earlier in this guide matter more than any other part of the process. We hear from customers who skipped careful layout on pre-painted doors, where the paint layer created an uneven bearing surface under the hinge leaf and caused persistent alignment problems that required starting over.
FAQ
Q1: How many surface mount hinges does a cabinet door need?
Most standard cabinet doors up to 30 inches tall need two hinges. Doors taller than 30 inches or heavier than around 15 pounds benefit from a third hinge centered between the top and bottom pair.
Q2: Can surface mount cabinet hinges be used on overlay doors as well as inset doors?
Yes. Flush (non-offset) surface mount hinges are designed for overlay doors, while offset versions handle inset doors. The installation process is the same for both configurations.
Q3: Do surface mount hinges require any special screws?
No specialty screws are required, but pilot holes sized correctly for the included screws are essential. Using screws that are too long risks splitting the door stile, particularly on narrower face-frame cabinets.
Q4: Is it possible to install surface mount hinges on a door that's already hung?
It's possible but awkward. The easier approach is to remove the door, install the door-side leaf on a flat surface, then rehang and mark the cabinet side as described in this guide.
Q5: What finish options does ForndLock offer for surface mount cabinet hinges?
We offer surface mount cabinet hinges in antique brass, oil-rubbed bronze, satin nickel, matte black, and polished chrome — all with matching screws included. Custom finishes for larger project orders are available on request.
Surface mount cabinet hinges are genuinely one of the more forgiving hardware choices for a DIY install. No mortising, no specialty jigs, no 35mm Forstner bits. The process described here is the same one we walk through with cabinet shops that order from us by the hundred-pair — just slowed down to individual-door pace.
If you're specifying surface mount cabinet hinges for a larger renovation, a commercial millwork project, we're glad to help you work through the details — finish matching, offset selection, quantity, or anything else. Send your project specs, drawings, or sample request to [email protected] and we'll respond with specifics, not a catalog link.