
How Do You Choose and Install the Right Boat Cam Latch?
There's a particular kind of frustration that comes from opening a hatch compartment mid-passage and watching your gear shift because the latch popped under wave load. Or returning to the dock after a season to find a latch so corroded it's fused shut. At ForndLock, we hear these stories constantly — from production boat builders, from refit yards, from owners who grabbed whatever was in stock without thinking through fit, material, or mounting geometry. The boat cam latch is one of those components that gets treated like a commodity until it fails, and then it becomes a safety conversation. This guide covers the decisions that matter: how the mechanism actually works, how to size it correctly, when flush mount beats surface mount, how to install it without cracking your fiberglass, and what material specification you actually need for your operating environment.
What Exactly Is a Boat Cam Latch and How Does It Work?
A boat cam latch is a quarter-turn fastener that uses an off-center rotating cam bar to pull a hatch or panel tightly against its frame — and that eccentric geometry is precisely what makes it more vibration-resistant than a simple slam latch in rough water conditions.
Think of it less like a bolt sliding into a receiver and more like a deadbolt that tightens as it turns. As the cam bar rotates, its offset geometry progressively increases clamping force against the frame lip, so the harder the sea state tries to rattle the hatch open, the more the cam geometry resists it. A spring-dependent latch relies on a pre-loaded mechanism that degrades over time — salt crystallization, thermal cycling of fiberglass panels, and constant vibration all work against spring tension. The cam geometry doesn't degrade the same way because the clamping force is mechanical, not stored energy.
Three motion types fall under the cam latch family: standard rotate-to-lock (the most common), lift-and-turn (which requires lifting the handle before rotation to disengage), and compression (which actively pulls the two surfaces together as it closes). They're frequently confused in catalogs, but they're not interchangeable — a compression latch is the right choice when you need a positive seal against water ingress under pressure; a standard cam latch is appropriate for compartments where quick access matters more than watertight performance.
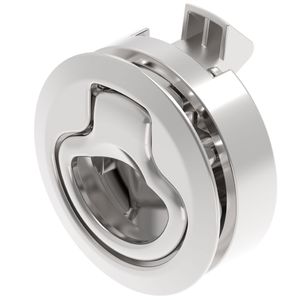
At ForndLock, our marine OEM clients specify cam bar offset angles between 12° and 18° depending on the clamping force requirement. That offset angle, combined with the cam bar length, determines how much pull force the latch generates — and it's the variable that most generic product pages never mention.
How Do You Pick the Right Size Boat Cam Latch for Your Hatch?
The right size boat cam latch comes down to three measurements you must take before ordering: the cutout diameter your panel can accept, the panel thickness the cam bar must span, and the grip range needed to pull the hatch flush — get any one of these wrong and the latch either spins freely or overtightens and cracks the flange.
Why Does Cutout Diameter Matter So Much?
The cutout diameter determines which latch body fits the hole — the two most common standards are 2" and 2-1/2", and mixing them up means your flange won't seat and your cam bar won't reach the frame.
For round flush mount latches, 2" and 2-1/2" cover the vast majority of production applications. Some rectangular flush mount styles use non-circular cutouts, so confirm the latch model's specific geometry before picking up a hole saw. When measuring an existing hole, use calipers across the diameter at two perpendicular axes — fiberglass cutouts are often slightly oval from hand drilling, and you want the larger dimension. When cutting a new hole, a center punch mark on masking tape protects the panel surface and keeps the hole saw pilot bit from wandering. Flange OD matters too: a flange that's undersized leaves a visible gap around the cutout that channels water directly into the panel edge; one that's oversized may overlap adjacent hardware or hinge mounting screws.
How Does Panel Thickness Affect Cam Bar Selection?
Panel thickness directly controls which cam bar length you need — a cam bar that's too short won't engage the frame at all, while one that's too long creates uneven clamping pressure that can warp thin fiberglass panels over time.
Typical hatch panels run 1/4" to 3/4" for fiberglass; aluminum panels are often thinner, sometimes as little as 3/16". The cam bar must span the full panel thickness and still reach the frame lip when rotated. For recessed frames — where the frame sits lower than the panel face — an offset cam geometry is necessary to bridge the step. For production builds, ForndLock recommends specifying adjustable cam bars with a set-screw collar rather than fixed-length bars. The adjustment range typically covers 3/8" of panel thickness variation, which matters when you're running the same latch spec across multiple hull sizes with slightly different layup thicknesses.
Cutout Diameter | Panel Thickness Range | Cam Bar Type | Typical Application |
2" | 1/4" – 1/2" | Short straight | Deck hatches, thin composite panels |
2" | 1/2" – 3/4" | Long straight or adjustable | Live wells, thicker fiberglass lids |
2-1/2" | 1/4" – 1/2" | Short straight or offset | Cockpit compartments, aluminum panels |
2-1/2" | 1/2" – 3/4" | Long adjustable | Engine hatches, heavy-duty storage lids |
Is a Flush Mount Boat Cam Latch Better Than a Surface Mount?
For deck hatches and any surface where foot traffic or water pooling is a concern, a flush mount boat cam latch is the stronger choice because it eliminates the protruding handle that catches lines, creates a trip hazard, and channels standing water directly into the mounting screws.

Flush mount latches sit recessed into the panel face; the handle lifts up to operate and drops back flush when closed. Surface mount units sit proud of the panel — they're faster to install, easier to grip with gloves, and well-suited for vertical cabinet doors, interior lockers, and bulkhead panels where water drainage isn't a concern. The waterproofing difference is meaningful: flush mount designs inherently shed water away from the fastener zone by keeping the flange face below the panel surface. Surface mount units rely entirely on the quality of the back-plate gasket, which is the first thing to harden and crack in UV-exposed environments.
When Does a Locking Cam Latch Make Sense?
A locking boat cam latch is worth specifying any time the compartment holds electronics, flares, or valuables — but it also adds a meaningful layer of security for charter vessels and rental fleets where you can't control who has access.
Key cylinder integration in a cam latch body adds minimal profile height — typically 3mm to 5mm above the standard latch face — so the flush mount advantage is preserved. For production builders ordering in volume, the cost delta between locking and non-locking is real but modest, and the operational benefit on exterior-facing hatches outweighs it. ForndLock has supplied locking cam latches to charter boat builders who standardized on a single key system across their entire fleet — one key per boat, same cylinder spec across all exterior hatches, which simplifies crew handover and reduces the cost of lost-key lockouts significantly. Our recommendation: specify locking on all exterior-facing hatches, and non-locking is acceptable for interior-only storage panels that aren't accessible from deck.
How Do You Install a Flush Mount Cam Latch on a Boat Hatch Step by Step?
Installing a flush mount boat cam latch correctly takes about 20 minutes per latch if you've measured the cutout and panel thickness first — rush the layout step and you'll either crack the flange seating or end up with a cam bar that doesn't reach the frame lip.
Tools needed before you start:
· Hole saw matching your latch's cutout diameter (2" or 2-1/2")
· Drill with bit sized for mounting screws
· Masking tape for panel surface protection
· Deburring tool or fine file
· Marine sealant (3M 4200 or equivalent)
· Hex key or screwdriver for set screw adjustment
Step 1 — Mark the cutout center: Apply masking tape to the panel surface where the latch will sit. Mark the center with a punch and confirm there's at least 1" of clearance behind the panel for the cam bar's full swing radius. If a stringer or frame member is in the way, the cam bar will bind at the locked position.
Step 2 — Cut the hole: Run the hole saw at low speed — this is the step where most fiberglass damage happens. High RPM generates heat that delaminates the gelcoat around the cut edge. Keep the saw perpendicular to the panel surface and deburr the edge thoroughly before fitting anything.
Step 3 — Dry-fit the latch body: Insert the latch without sealant. Check that the flange seats flat with no rocking. Rotate the cam bar through its full travel and confirm it clears the panel underside without binding.
Step 4 — Set the cam bar engagement: Close the hatch and rotate the latch to the locked position. The cam bar should make firm contact with the frame and pull the hatch snug. Adjust the set screw so the panel pulls tight without visibly flexing. A bowed panel means the cam bar is too long or the set screw is advanced too far.
Step 5 — Apply sealant and final mount: Run a continuous bead of marine sealant under the flange. Insert and tighten mounting screws in a cross pattern to seat the flange evenly. Wipe excess sealant immediately before it skins over.

Three installation mistakes we see repeatedly in warranty returns at ForndLock: cutting the hole without checking cam bar swing clearance behind the panel; over-tightening mounting screws on thin fiberglass, which fractures the flange seat; and skipping sealant on the back plate entirely, which allows water to wick along the screw shafts into the panel core. The number-one cause of latch body cracking we've documented is excessive hole saw speed on fiberglass — the heat stress at the cut edge creates micro-fractures that propagate under the flange when the mounting screws are tightened.
What Materials Should a Marine-Grade Boat Cam Latch Be Made From?
The material decision for a boat cam latch isn't simply stainless steel vs. plastic — it's about matching the alloy grade and finish to your specific operating environment, because 304 stainless that performs well on a freshwater bass boat will show surface rust within one season on an offshore saltwater vessel.
316 stainless steel is the correct specification for saltwater applications. The key difference between 316 and 304 is molybdenum content: 316 contains 2–3% molybdenum versus 0% in 304, and that addition is specifically what improves resistance to chloride-induced pitting. When reviewing a spec sheet, look for the molybdenum percentage explicitly — some suppliers label 304 with a "marine grade" description that is technically inaccurate. At ForndLock, all saltwater-rated cam latches use 316 stainless with a passivation treatment after machining, which removes free iron from the surface and maximizes the passive oxide layer.
Glass-filled nylon and marine-grade polymer latches are appropriate for freshwater applications, interior panels, and weight-sensitive builds where corrosion isn't the primary concern. The critical additive to verify is UV stabilization — an unstabilized nylon latch will become brittle and crack within a couple of seasons of sun exposure on an open deck.
One galvanic corrosion trap worth flagging: mounting a stainless cam latch directly into an aluminum hatch frame creates a dissimilar-metal contact that accelerates aluminum corrosion. The fix is straightforward — nylon washers under the mounting screw heads and a sealant barrier between the flange and the aluminum surface break the electrical contact.
Inside the ForndLock Factory: Hosting International Clients at Our Manufacturing Facility
What Are the Most Common Boat Cam Latch Problems and How Do You Fix Them?
Most boat cam latch problems — rattling, stiff operation, or a hatch that won't hold closed — trace back to one of three root causes: incorrect cam bar adjustment, corrosion buildup on the cam shaft, or a worn set screw that has allowed the cam bar to migrate out of position.
Rattling underway is almost always a cam bar set too loose. The fix is a quarter-turn tighter on the set screw — no tools required if the latch has a finger-adjustable collar. If the rattle returns after a few outings, the set screw itself may be undersized for the vibration load; apply a small amount of thread-locking compound on reassembly.
Stiff or seized rotation is typically salt crystallization on the cam shaft. Flush with fresh water, let it dry, and apply a PTFE-based lubricant spray. Avoid petroleum-based greases — they attract fine grit that accelerates shaft wear and eventually scores the bore.
A hatch that won't stay closed in rough water usually means the cam bar has backed off its set screw position over time. Re-engage and tighten, and add thread-locking compound if the problem recurs.
When to replace rather than repair: if the cam body shows visible cracking, or if the shaft has developed lateral play in the bore, replacement is the right call. A compromised latch on a deck hatch isn't a maintenance issue — it's a water ingress risk and a liability on any vessel with passengers aboard.
Getting the specification right before the boat launches is a fraction of the cost of retrofitting hardware after the fact — a lesson we've seen reinforced by builders who skipped the material check and spent a season dealing with corroded latches on brand-new hulls. The right boat cam latch, correctly sized and properly installed, should be a one-time decision.
Whether you're sourcing boat cam latches for a production build, a refit project, or need a custom cam bar geometry to match a non-standard hatch thickness, our team at ForndLock is ready to help. Send your drawings, panel specs, or sample requirements directly to [email protected] and we'll come back to you with a tailored recommendation.
Frequently Asked Questions
What is the standard cutout size for a flush mount boat cam latch?
The two most common cutout diameters are 2" and 2-1/2". Always confirm the specific latch model's required hole size before cutting, as some rectangular flush mount designs use non-circular cutouts that won't accept a standard hole saw.
Can I use the same cam latch on both freshwater and saltwater boats?
Not always. A 316 stainless cam latch works reliably in both environments, but a 304 stainless or uncoated zinc cam bar is only appropriate for freshwater use. Check the alloy specification — specifically the molybdenum content — before purchasing for any saltwater application.
How do I know if my cam bar is the right length for my hatch panel?
With the hatch closed and the latch rotated to the locked position, the cam bar should make firm contact with the frame and pull the hatch snug without visibly bowing the panel. If it rotates without catching the frame, the bar is too short; if the panel flexes under load, the bar is too long or set too aggressively.
Do I need marine sealant when installing a boat cam latch?
Yes. A continuous bead of marine-grade sealant under the flange before final mounting is strongly recommended. Without it, water wicks along the mounting screw shafts into the panel core, causing delamination in fiberglass or accelerated corrosion in aluminum frames.
What is the difference between a cam latch and a compression latch on a boat?
A cam latch rotates a bar to catch and hold the frame, relying on the cam geometry for clamping force. A compression latch uses a mechanism that actively pulls the two mating surfaces together when closed, creating a tighter seal — making compression latches the better choice for hatches that must resist water ingress under direct wave pressure.